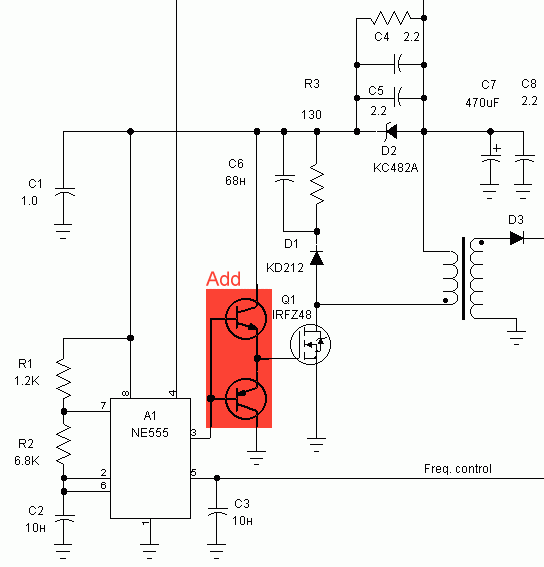
Coilgun "Pskov 1100" circuit description. The DC/DC converter is a common one-act backward converter, which is operated by a separate generator. I would like to remind you about the main piquancy of the backward conversion: in a design like this the voltage when going out doesn't depend on a transformation coefficient. But the transformation coefficient has an influence on switching peak voltages during the first coil, which are converted from the second coil in the opposite direction, so don't use transformers with too little coefficient, otherwise there would be too high pulsed voltage in the first chain.
This pulsed voltage should be overpowered by snub chains. The power discharging on the cells of these chains is wasted. In my design a part of power from the snub chains D1, C6, R3 is used as a power supply for oscillator chip A1. So, the converter is started with power voltage at about 6 Volts and then the power voltage of the chip is set at the level of 15 Volts, which is necessary for quick turning-on and turning-off the key of MOSFET semiconductor Q1. The overstepping of IC power voltage over accumulator voltage is limited by Zener diode D2 (8.2V 1.3W). Such a design increases a little bit an efficiency of the DC/DC converter and also assumes an employment of a comparatively low voltage of the accumulator battery.
The employment of a leading oscillator in contradistinction to the using of auto oscillate circuit designs makes it possible to get stable current of consumption and power not depending on charge degree of high voltage capacitors. Such a solution decreases charging-time of condensers in comparison with an auto oscillator. According to the pin 4 of the IC A1 the converter switches off when voltage of condenser reaches 800 Volts. According to the 5th pin of the IC A1 there occurs the operation of the frequency of conversion.
If the battery discharge is below the quota, the converter frequency increases three times, which leads to a decrease of a consumed power.
Such a solution conduces to sparing duty of functioning of the batteries, by reducing the consumed power as the battery discharges. A converter transistor is set on a small radiator, and a ferrite bead covers the pin of the gate.
A control unit is fully made with transistors, without using chips. Circuit designs of the control unit are classified as the special ones and are extremely reliable. The control unit isn't sensitive to interference in the power circuit, that allows not use large capacitors or stabilizers in the conditions of a combined power of both control unit and a converter unit, by one power supply. In general, the DC/DC converter, consuming a DC current about 2 Amps (the current is consumed by impacts with an amplitude at about 7 Amps), gives high interference in the power circuit.
The voltage of capacitor is controlled by a neon bulb. The main drawback of the neon bulb - high hysteresis - is overcome by using resistor R5, with high resistance, and the chains R6, R7, C9. If the bulb is lighted, the current that goes through it reduces the voltage of the bulb almost up to the mark of switching the bulb off. A small additional reduction of the controllable voltage would immediately cause switching the bulb off and resumption of the DC/DC converter functioning.
In the perfect design the converter should be turned on about every 5 seconds on a shirt time, keeping up the capacitor voltage of 800 Volts. With every turning of the DC/DC converter on a blue LED D6 fades and then glows again with the full charge voltage on the capacitors.
There is a circuit of power voltage control made on the transistors Q3, Q4. If the power voltage reduces up to 6 Volts, a red LED D7 lights, and the converter is put on the duty of lower power. Besides, the current consumed by the converter reduces, and the voltage of the batteries increases a bit, which leads to the turning of the converter into the original duty of normal power. So, when the batteries are almost used up, the red LED D7 is flashing approximately once in two seconds, and the converter works by turns first on complete, then on lower power.
With further discharge of the accumulator battery the converter more and more time works in the duty of lower power, until finally completely goes over to this duty. In addition, the red LED D7 would be constantly switched on, which points to the necessity of charging the batteries. At this moment it is still possible to conduct one or two shots more, but there would be just a minute between these shots, instead of usual 22-25 seconds, also deep discharge isn't useful for the batteries.
A current emitter for laser diode D10 is assembled on the transistor Q5.
A green LED D9 is a current stabilizer, simultaneously it performs the function of power ON indicator.
The availability of the projectiles is represented by a LED D11, which is operated by a switch sensor.
In addition I would like to draw your attention one more time to the very high stability of the suggested design against all the sorts of false effects, interference and other unfavorable factors.
Pulsing transformer is made out of common small ferrite choking coil, there is an insulate pipe over it and also one more coil is wound over all of these.
The sensor of bullet position is a ferrite rod, 2,5 mm in diameter, 10 mm long, which is covered with 3 layers of copper wire of 0,1 mm in diameter. The sensor should be phased in a right way (the ends should be changed, if it doesn't work).